If you are planning an outdoor bbq area with roof for 2026, the biggest questions are usually layout, airflow, and how to keep it comfortable in real weather. Do you need a full outdoor bbq area roof structure, or will a partial cover and side screens do the job? Maybe you are comparing a backyard setup with bbq area ideas outdoor rooftop options for a terrace or penthouse, or you are deciding between bbq area ideas outdoor with roof and an outdoor bbq area without roof plus umbrella solutions. In this guide, I will walk through designs that feel modern, photograph beautifully, and function safely. I will also call out details that make an outdoor rooftop bbq area work better, especially when space is limited. By the end, you will have clear direction for materials, furniture, lighting, and ventilation for both large patios and a small outdoor bbq area with roof.
Outdoor BBQ Area With Roof 2026: Layouts That Work In Any Backyard
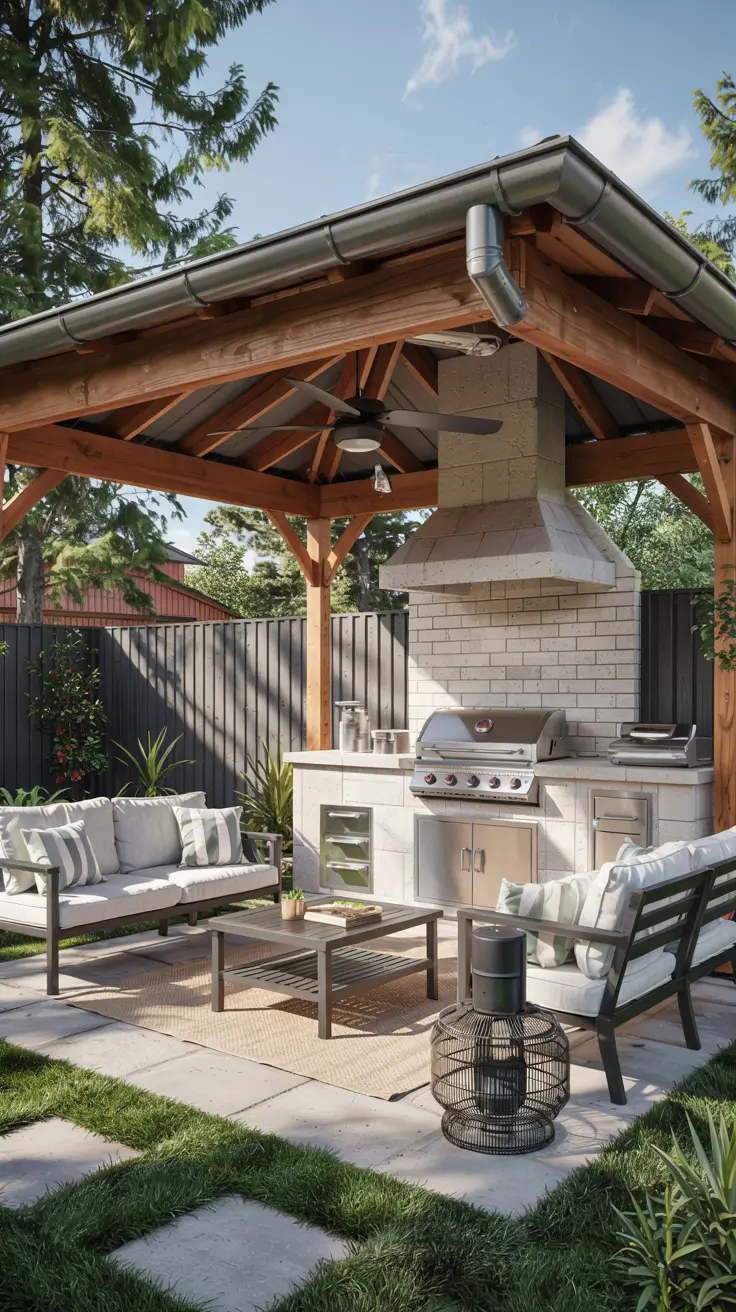
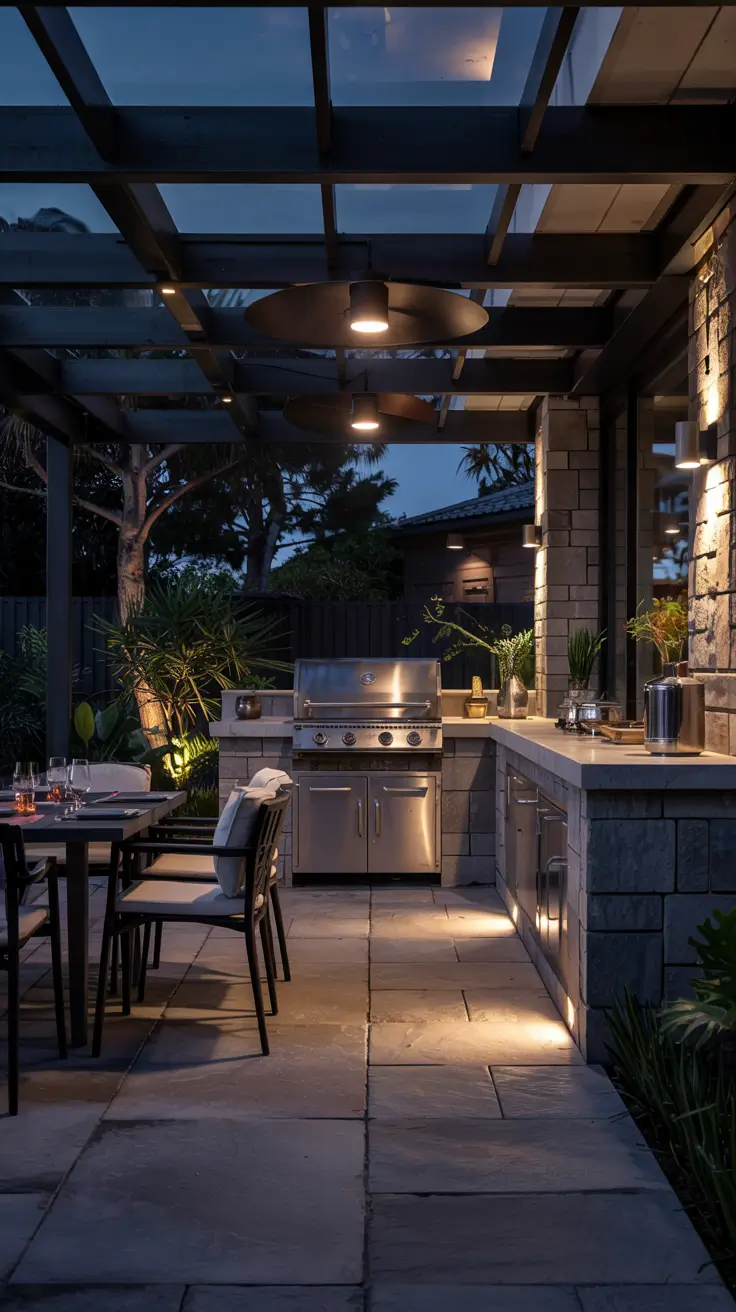
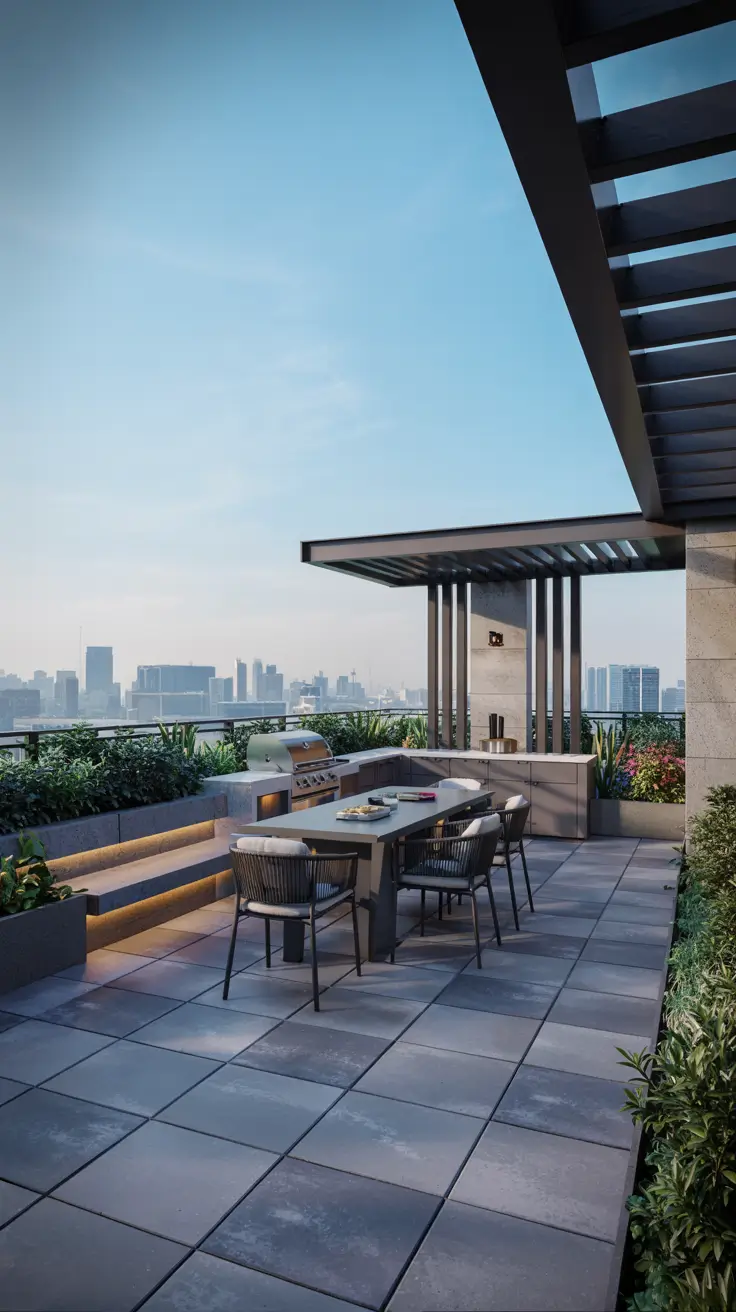
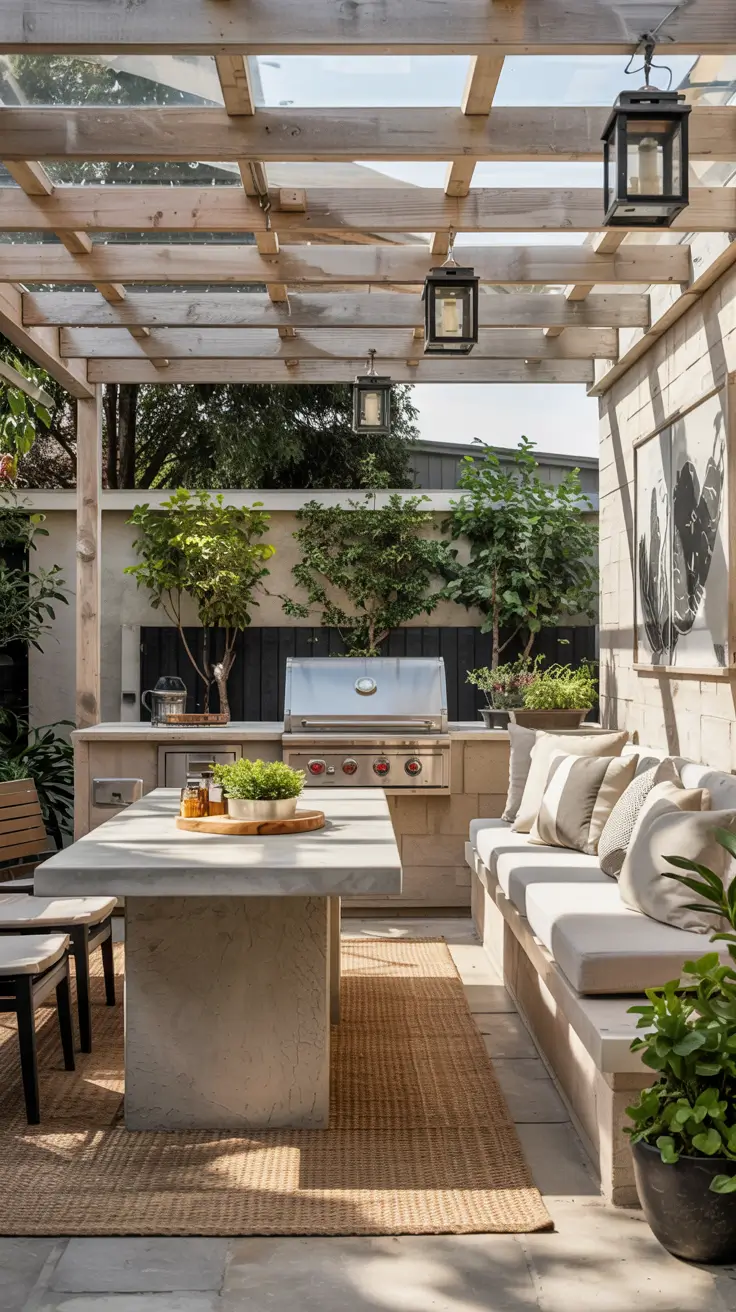
When I plan an outdoor cooking zone under a roof, I start with circulation and heat distance, not decor. I like a simple arrangement where the grill sits on the downwind edge, with prep space immediately beside it and seating a few steps away. In most backyards, an L-shape or straight-line run keeps the footprint clean and prevents traffic from crossing behind the cook. I also pay attention to sightlines, because a roofed BBQ area feels best when it connects visually to the yard and the house. For 2026, the most functional layouts feel open, with defined zones that do not rely on walls to create structure.
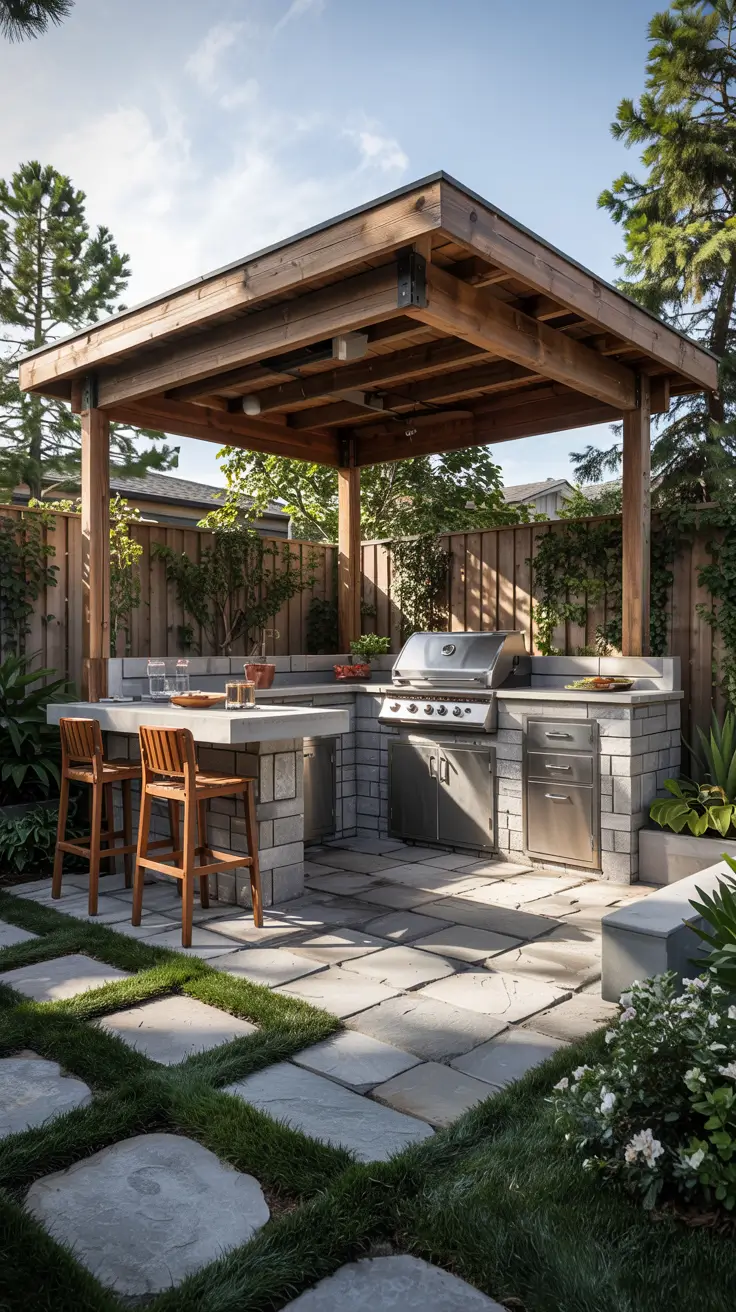
For furniture and built-ins, I prioritize a durable prep counter, a heat-safe landing zone, and weatherproof storage. I like base cabinets with sealed edges for tools and a pull-out trash system so cleanup does not become messy. If space allows, I add a bar-height ledge or a narrow dining table, because it creates a natural gathering spot without putting guests in the smoke path. Under-roof rugs can work, but I choose outdoor-rated flatweaves that do not trap grease and are easy to hose off. I also plan a dedicated spot for a cooler or beverage fridge, so drinks do not end up on the prep surface.
In my experience, the layout succeeds when it feels like a small outdoor kitchen, not a grill parked under cover. I keep the grill-to-prep-to-serve flow short, and I avoid putting the grill directly against the house wall where grease and heat can build up. When homeowners tell me the area feels cramped, it is usually because seating is oversized or placed too close to the cook line. I prefer lighter visual weight – slim-profile chairs, a simple table base, and open shelving only where it will not collect grime. If you plan to entertain often, I suggest prioritizing elbow room over extra features you will not use.
What I would add to complete this section is a measured plan with clear walkway widths and a simple zoning diagram. I also recommend noting where electrical outlets and water access will go, because these details affect the final layout more than any finish choice. If you want the space to look intentionally designed, add one anchoring element like a low fireplace wall or a planter spine that separates cooking from lounging. Finally, I would include a small checklist for safety clearances around the grill and any adjacent wood surfaces.
Outdoor BBQ Area Roof Types: Pergola, Pavilion, Retractable, Or Solid Cover
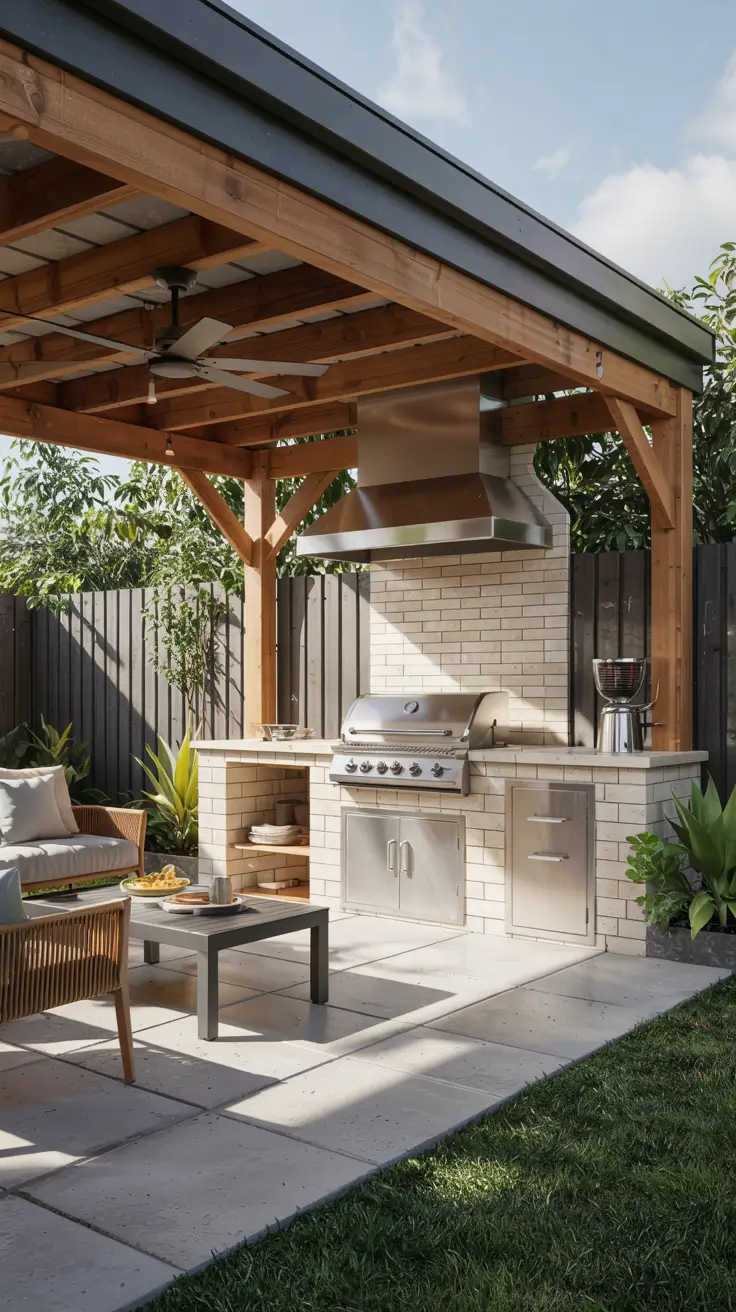
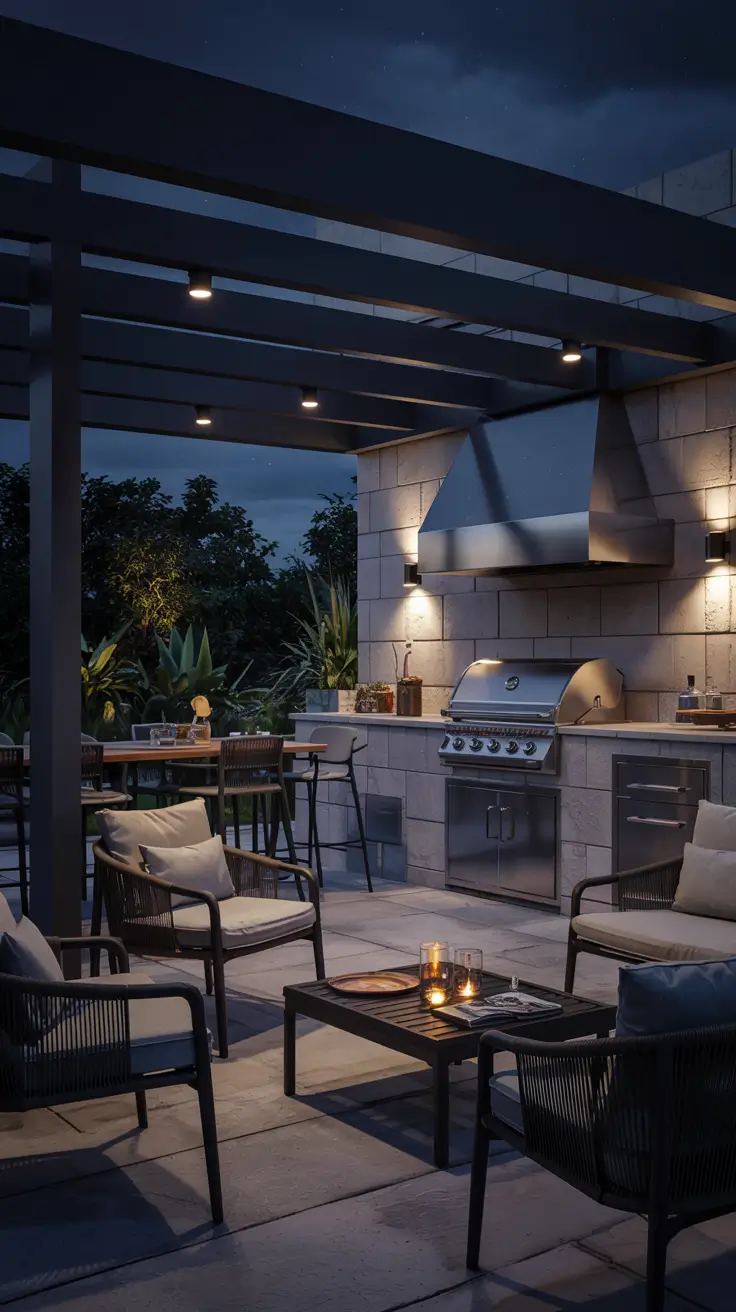
Choosing the roof type is not just a style decision – it controls shade, ventilation, and how the space feels year-round. I treat pergolas as a light-filtering solution that photographs well and keeps the area airy. A pavilion is my choice when someone wants a defined outdoor room with stronger weather protection and a more architectural look. Retractable roofs are great when you want sun sometimes and shade other times, especially on rooftops where wind and glare can be intense. A solid cover is the most protective, but it requires more planning for smoke, lighting, and drainage.
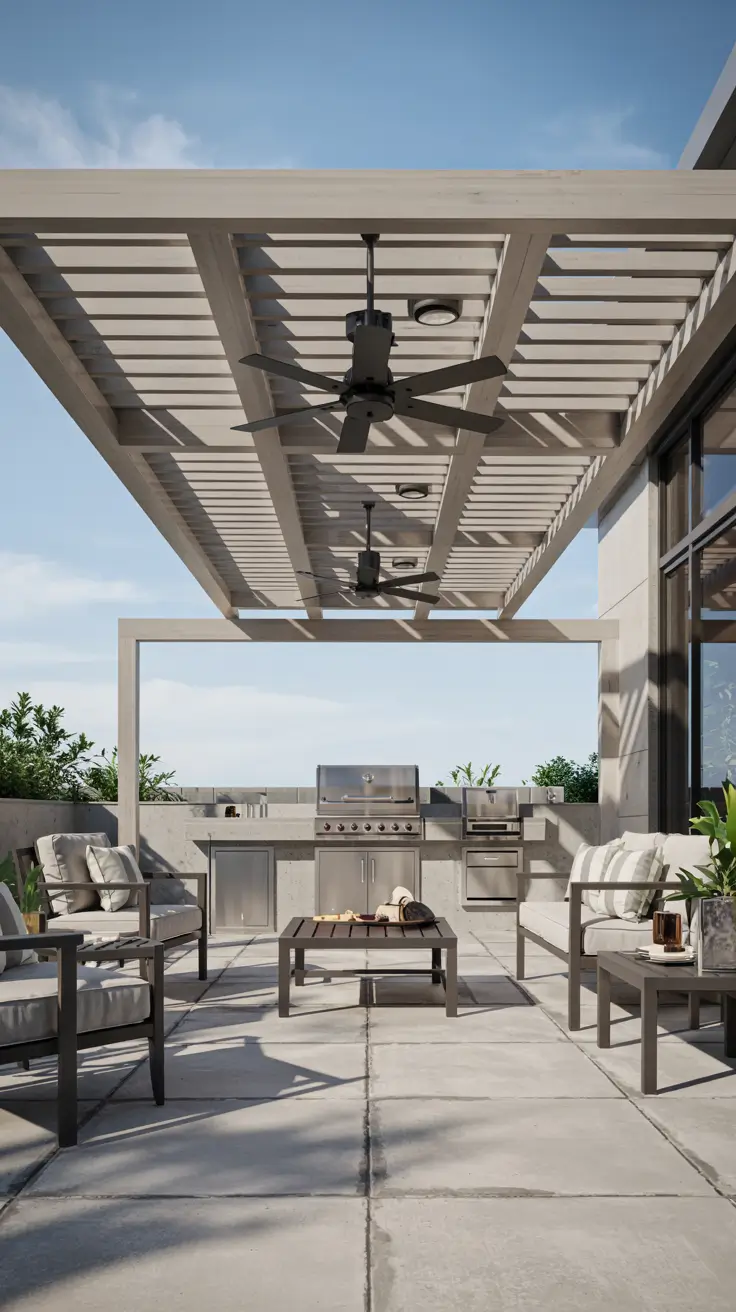
In terms of materials, I often specify aluminum or powder-coated steel for a crisp 2026 look and low maintenance. For pergolas, adjustable louvers are practical because you can control sun angle without adding clutter like extra umbrellas. For a pavilion, I like a clean ceiling finish such as painted tongue-and-groove or smooth panels that hide wiring for fans and lights. Retractable systems look best when the tracks and supports are integrated into the structure rather than added as an afterthought. With solid covers, I add gutters and a discreet downspout plan early so water does not pour onto the cooking zone.
From what I have seen, most frustrations come from picking a roof that does not match how people actually grill. If you cook weekly, a pavilion or solid roof tends to feel more reliable than a pergola, especially when rain shows up. If you grill occasionally and you like sun, a pergola can be perfect, and it still beats an outdoor bbq area without roof when the heat is intense. For rooftop projects, I lean toward retractable or louvered solutions because they let you manage wind and direct sun without making the deck feel boxed in. The best roof choice is the one that supports comfort while staying open enough to breathe.
What I would add here is a quick decision guide based on climate and usage frequency. I would also include notes on local requirements, because roof structures can trigger permitting depending on size and attachment. Finally, I would add a small finishes section explaining how to keep the roof style consistent with the rest of the home, so it looks designed rather than temporary.
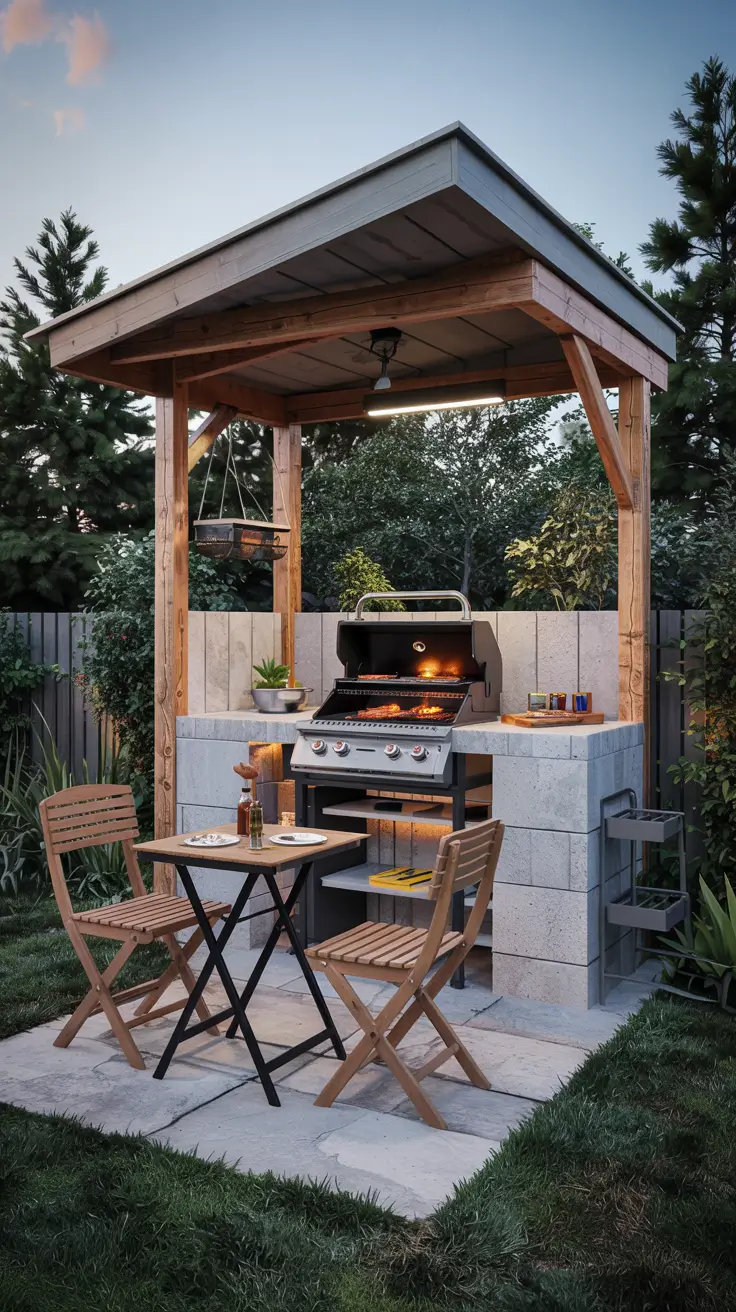
Small Outdoor BBQ Area With Roof: Smart Zoning For Tight Spaces
A small outdoor bbq area with roof works when every element has a job and nothing blocks movement. I start by choosing a compact grill and placing it at the edge of the covered zone so smoke can drift out naturally. In tight patios, I like a straight-line setup with the grill, a narrow prep counter, and vertical storage to keep the floor clear. I also use zoning tricks, like changing floor texture or adding a slim planter, to visually separate cooking from seating. The goal is to make the space feel intentional, not crowded.
For furniture, I use smaller pieces that still feel comfortable, like armless chairs, backless stools, and a narrow table that can tuck against a wall. Fold-down or slide-out counters are especially useful, because they expand prep area only when you need it. I recommend closed storage for tools and spices, since open shelves in small spaces look cluttered quickly. If you want softness, I prefer one bench cushion and a couple of outdoor pillows rather than lots of layers. Under a roof, a compact ceiling fan can also make the area feel larger by improving comfort without adding furniture.
In my own projects, the biggest win is reducing visual noise. I keep finishes consistent – one counter material, one cabinet color, and hardware that matches the grill finish. When I design for apartments or rooftop terraces, I make sure there is a clear path to the exit and a stable surface for hot items. If the space is extremely small, I sometimes recommend a modular setup rather than built-ins, because it can adapt if you move or reconfigure the patio. A tight BBQ area feels luxurious when it is clean, calm, and easy to use.
What I would add to this section is a list of minimum clearances for safe grilling and comfortable seating. I would also include a few examples of compact appliance choices, like a slim beverage fridge or a small sink, and where they fit best. Finally, I would add guidance on storage density – what to store on-site versus what to keep inside – so the area stays uncluttered.
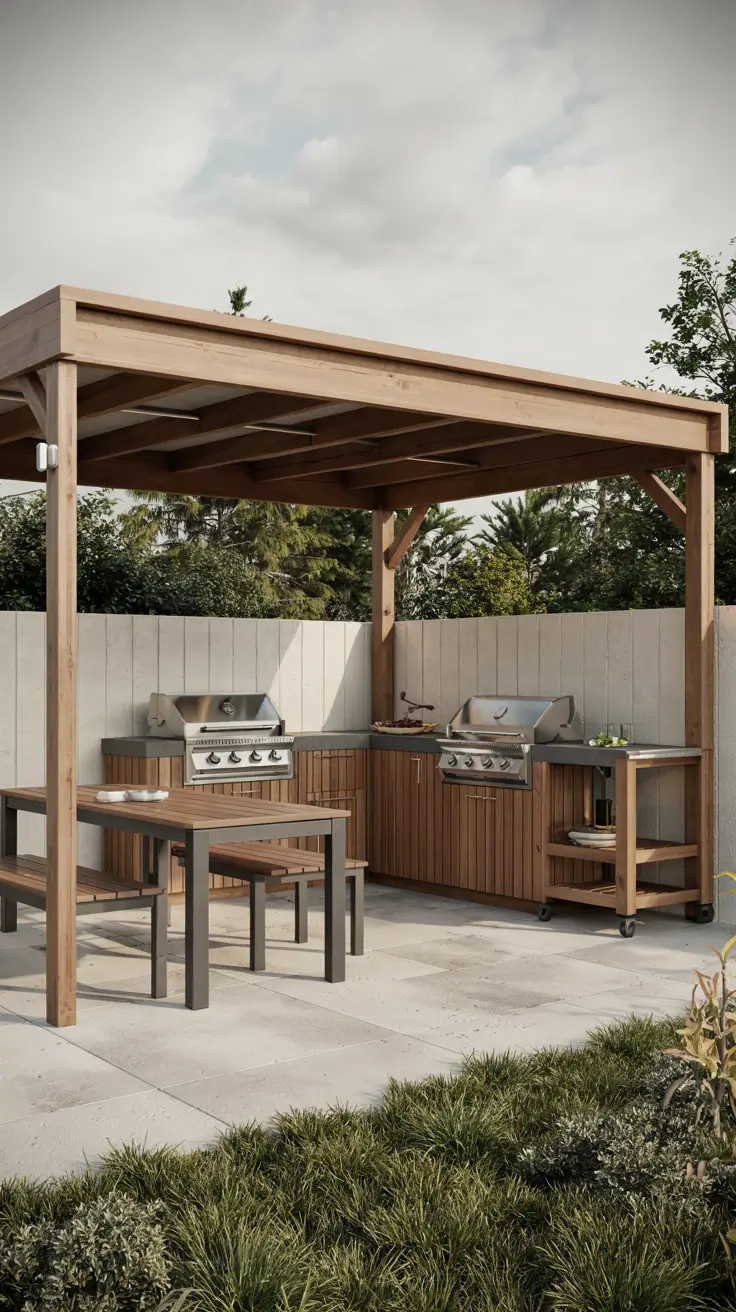
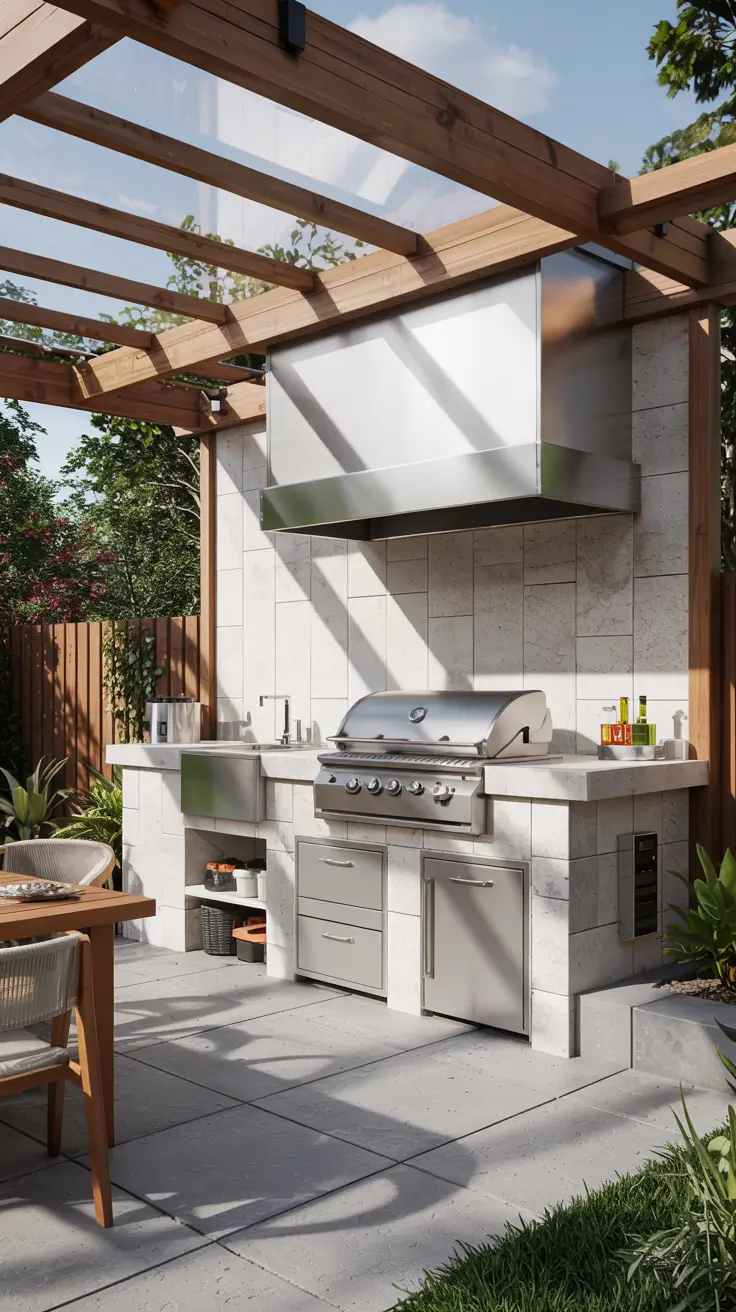
BBQ Area Ideas Outdoor With Roof: Built-In Grill Stations Vs Modular Setups
When people ask me which is better, built-in or modular, I answer based on how permanent the space should feel. Built-in stations create a polished outdoor kitchen look, and under a roof they read like a true extension of the home. Modular setups are flexible and often smarter for rooftop decks, rentals, or anyone still testing the best layout. Under a roof, both can look modern if the materials are coordinated and the proportions are clean. The key is to design the whole zone, not just the grill.
With built-ins, I like a simple base with weatherproof doors, a heat-safe countertop, and a dedicated prep run. I include a proper landing area for trays, plus a drawer or cabinet for grilling tools so everything stays within reach. For modular setups, I focus on a high-quality grill cart, a separate prep cart, and a storage bench that doubles as seating. I also prefer modular pieces with locking casters so they feel stable while cooking. If you want the look of built-ins without the commitment, a framed surround with removable components can be a great middle option.
In my experience, built-ins feel best when you know the roof structure and airflow plan are final. I have seen beautiful built-ins ruined by smoke staining because the grill was placed too deep under a solid cover without ventilation planning. Modular setups avoid that risk because you can shift the grill position based on wind and season. For 2026, I also like the way modular pieces support quick updates, like swapping counters or adding a pizza oven without demolition. The best choice is the one that matches your lifestyle and the permanence of the property.
What I would add here is a practical budget breakdown of where to spend and where to simplify. I would also include a maintenance checklist, because built-ins and modular carts age differently under weather exposure. Finally, I would add notes on how to make modular setups look intentional, such as matching finishes, repeating materials, and using one consistent lighting plan.
Weather-Ready Roofing: Rain, Wind, Sun, And Heat Protection Tips
A roof over a BBQ area is only as good as its performance in real weather. I plan for rain first, because water management affects comfort, safety, and how clean the space stays. Wind matters too, especially on corner lots or rooftop decks where gusts can push smoke back under the roof. Sun and heat protection are essential in 2026 designs, because roofed zones often become the most-used part of the yard in summer. If the roof does not handle these conditions, the space will feel unreliable.
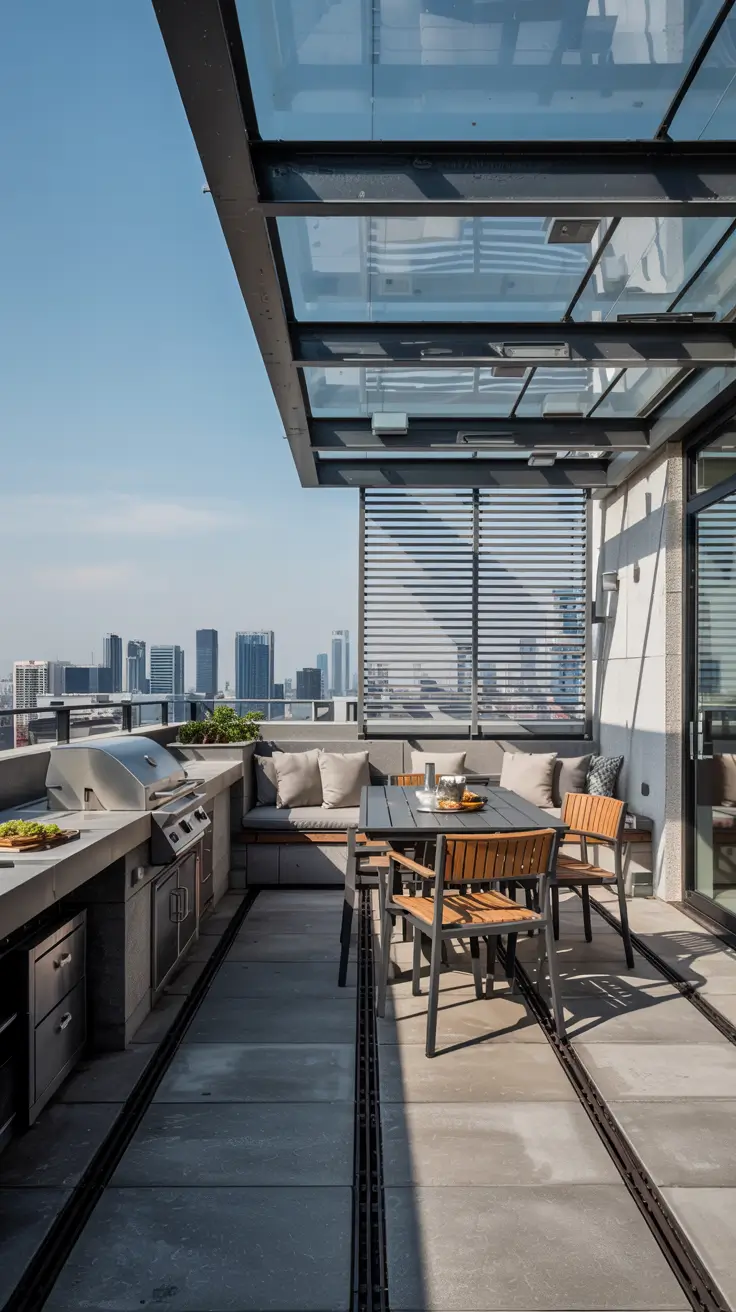
For rain, I like adding gutters, a slight roof pitch, and a clear path for water to drain away from the cooking zone. For wind, I use side screens, slatted walls, or tempered glass panels in strategic positions, leaving enough openness for ventilation. For sun, I combine roof shade with light-colored ceiling finishes that bounce light and reduce glare. Heat protection includes choosing non-combustible surfaces near the grill, plus keeping overhead materials rated for high temperatures. I also recommend a dedicated heat-resistant mat under the grill if the flooring is composite or wood.
From my own experience, the comfort details are what make people use the space more often. A roof is great, but it feels next-level when you add a ceiling fan, a small radiant heater for shoulder seasons, and side lighting that makes evenings practical. If you are comparing this to an outdoor bbq area without roof, you will notice that covered areas stay cleaner and more usable after rain, especially when storage is protected. For an outdoor rooftop bbq area, wind screens and secure furniture become non-negotiable because conditions change quickly. The more you plan for weather, the more the BBQ area becomes a true outdoor room.
What I would add is a simple material guide for humid, coastal, and high-sun regions. I would also include recommendations for furniture fabrics that resist fading and mildew. Finally, I would add a short safety note about keeping flammable decor, curtains, and plants away from the grill zone.
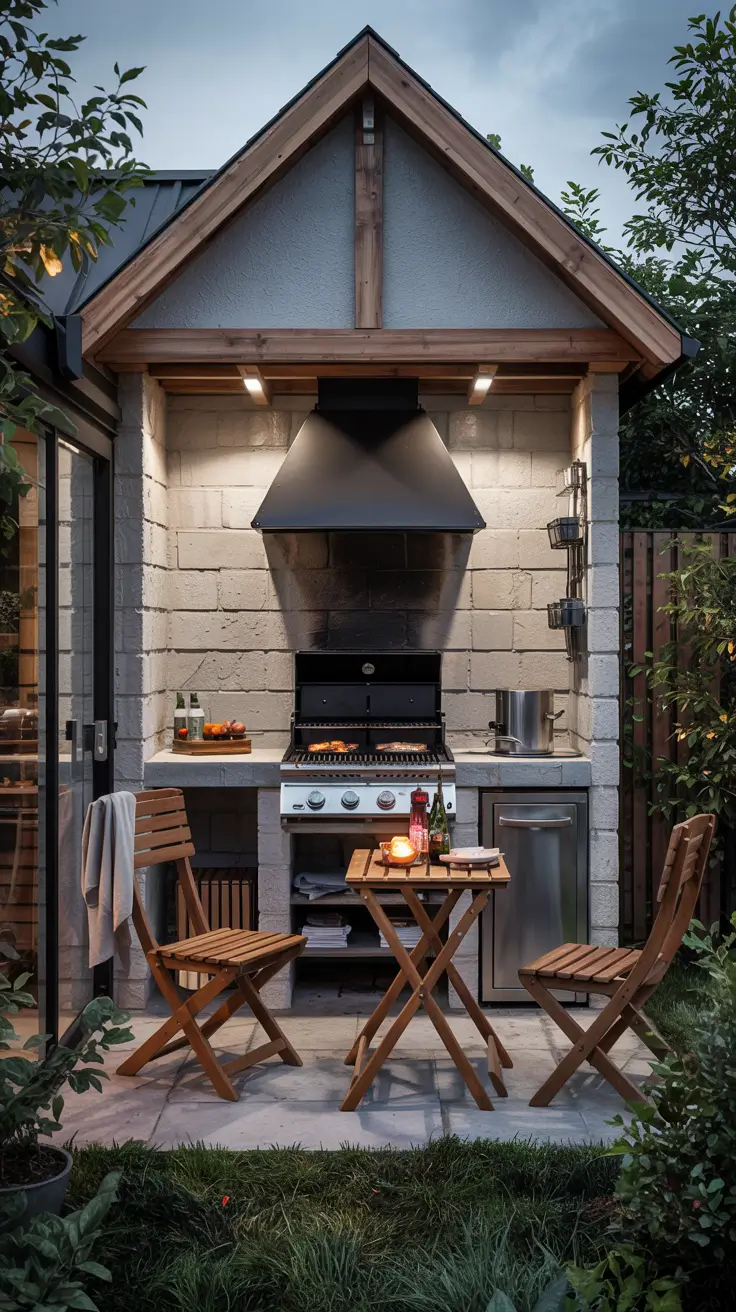
Ventilation And Smoke Flow: Keep The Outdoor BBQ Area Comfortable Under A Roof
Ventilation is the difference between a roofed BBQ area that feels like a dream and one that traps smoke. I plan smoke flow by placing the grill near an open edge and keeping the roof height generous above the cooking surface. If the roof is solid, I treat the space like a semi-outdoor kitchen and plan for mechanical help if needed. I also pay attention to prevailing winds, because wind can either carry smoke away or push it back into the seating zone. Good ventilation keeps guests comfortable and reduces staining on ceilings and walls.
In the setup, I like a combination of openness and targeted airflow tools. A ceiling fan helps with comfort but should not blow directly across the grill, because that can affect flame behavior and push smoke unpredictably. If the design calls for it, I add a vent hood rated for outdoor use, especially when the roof is enclosed on multiple sides. I also use heat-tolerant wall finishes near the grill, so the area stays clean and safe over time. For rooftop projects, I keep the grill positioned so smoke exits toward open air, away from neighbors and building walls.
In my experience, most smoke complaints come from roofs that are too low or from enclosing the space without planning an exit path. I have also learned that a beautiful ceiling finish is only practical if you can keep it from collecting soot. When I want the space to feel calm, I separate cooking and lounging by a few steps and angle seating so guests are not facing the grill directly. A comfortable BBQ area is one where you can cook slowly without everyone breathing smoke.
What I would add is a clear list of placement rules – how far the grill should sit from walls, where openings should be, and when a hood becomes worth it. I would also include a note about local codes and manufacturer clearance guidelines, because they matter for safety. Finally, I would add tips for keeping the ceiling clean, like using washable finishes and planning access for maintenance.
Lighting Under The Roof: Task Lights, Ambient Glow, And Night BBQ Safety
Lighting is one of my favorite upgrades because it changes how often you actually use the space. Under a roof, I plan layers of light so the grill area is bright enough for safe cooking, while seating stays warm and inviting. I start with task lighting over the grill and prep surfaces, then add ambient lighting that fills the space without glare. For 2026, the best outdoor BBQ areas feel like outdoor living rooms at night, not spotlighted work zones. Good lighting also makes photos look clean and modern.
For fixtures, I like recessed lights or slim surface-mounted LEDs for general illumination, paired with directional task lights aimed at the grill. Under-cabinet strips are excellent for prep counters because they remove shadows where you cut and plate food. For ambiance, I use wall sconces, warm pendant-style outdoor fixtures, or a subtle perimeter glow along beams. Path lights leading to the BBQ area improve safety and help the space feel connected to the rest of the yard. I also like dimmers, because they let you shift from cooking mode to relaxing mode instantly.
In my experience, people underestimate how much safer a well-lit grill zone feels. I prefer lighting that is controlled in zones, so you can keep the prep area bright while dimming the lounge area. On rooftop decks, I also avoid fixtures that create strong glare, because reflections off nearby glass and railings can be harsh. A balanced lighting plan makes the roof structure look more architectural and makes the whole area feel finished. If you do one upgrade beyond the grill itself, lighting is often the one you notice every time.
What I would add is a simple lighting map that shows where each layer belongs and what it is meant to do. I would also include guidance on choosing outdoor-rated fixtures and placing switches in convenient locations. Finally, I would add a note on emergency lighting, like a discreet motion sensor near steps or doors, so late-night BBQs stay safe.
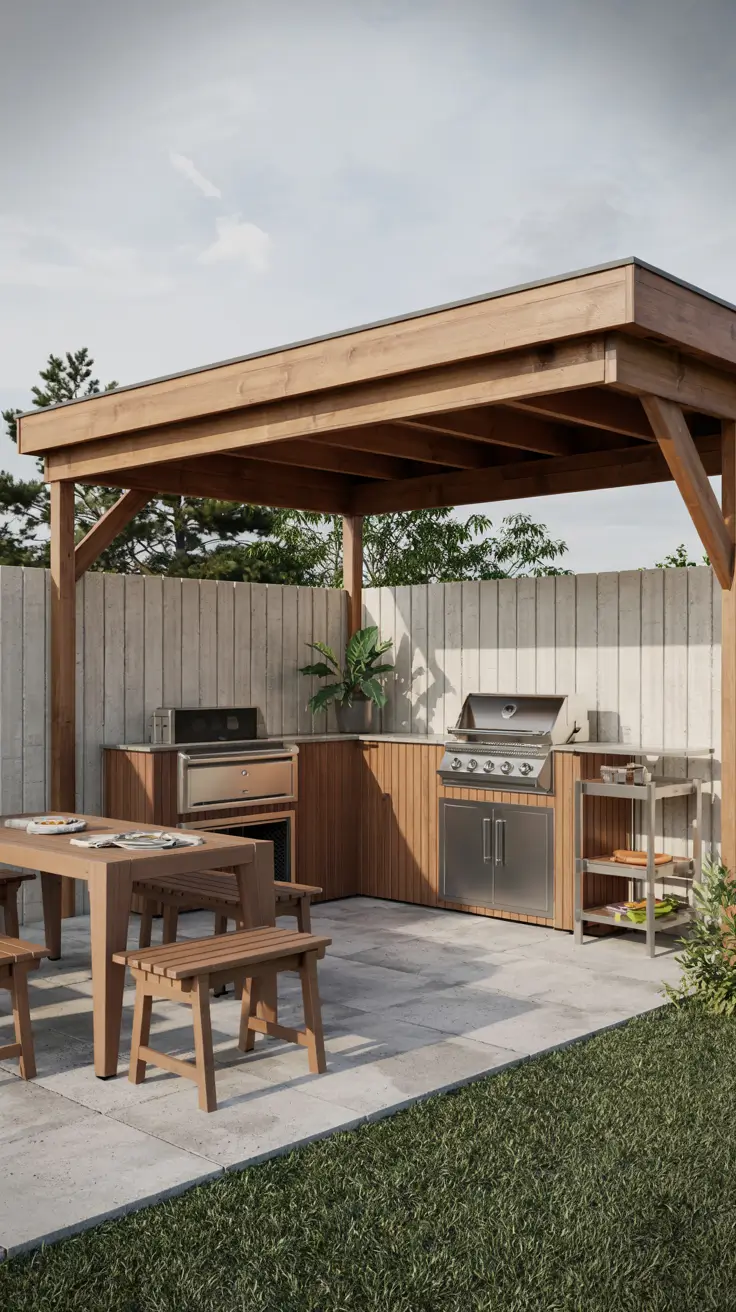
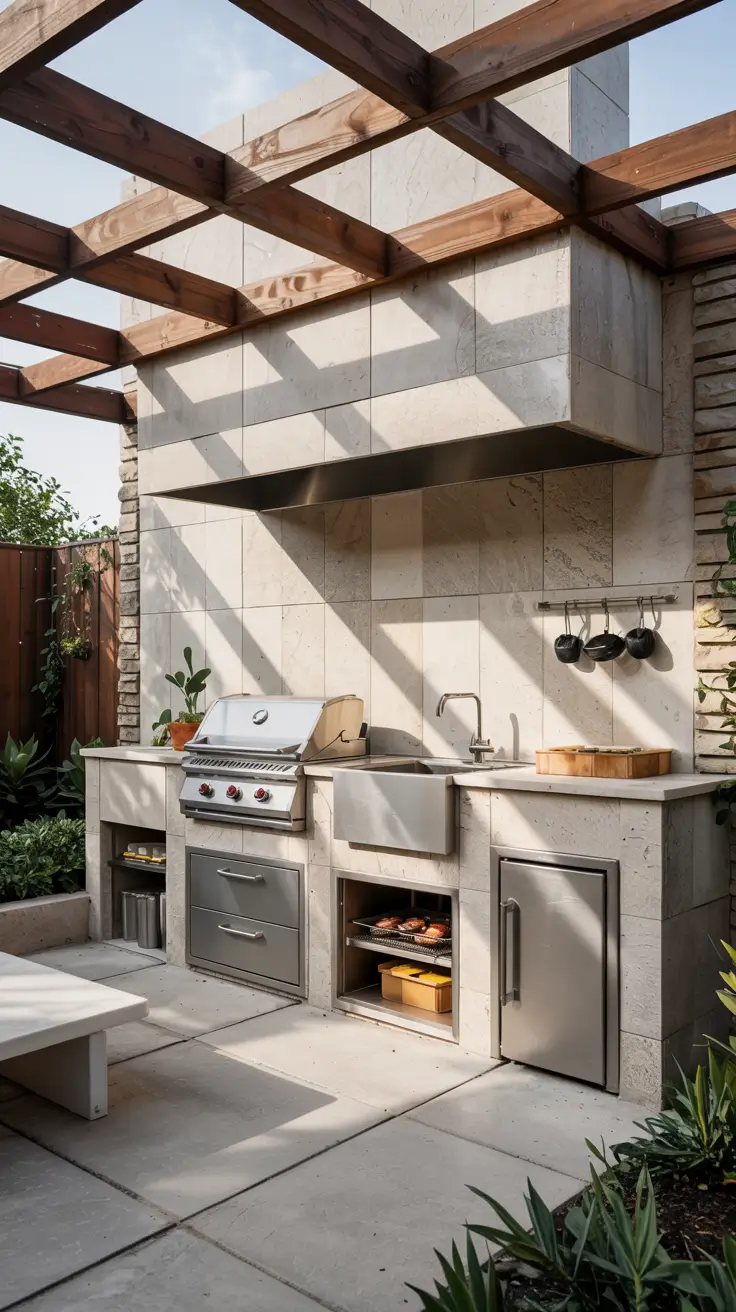
Materials That Last: Wood, Metal, Polycarbonate, And Composite Options
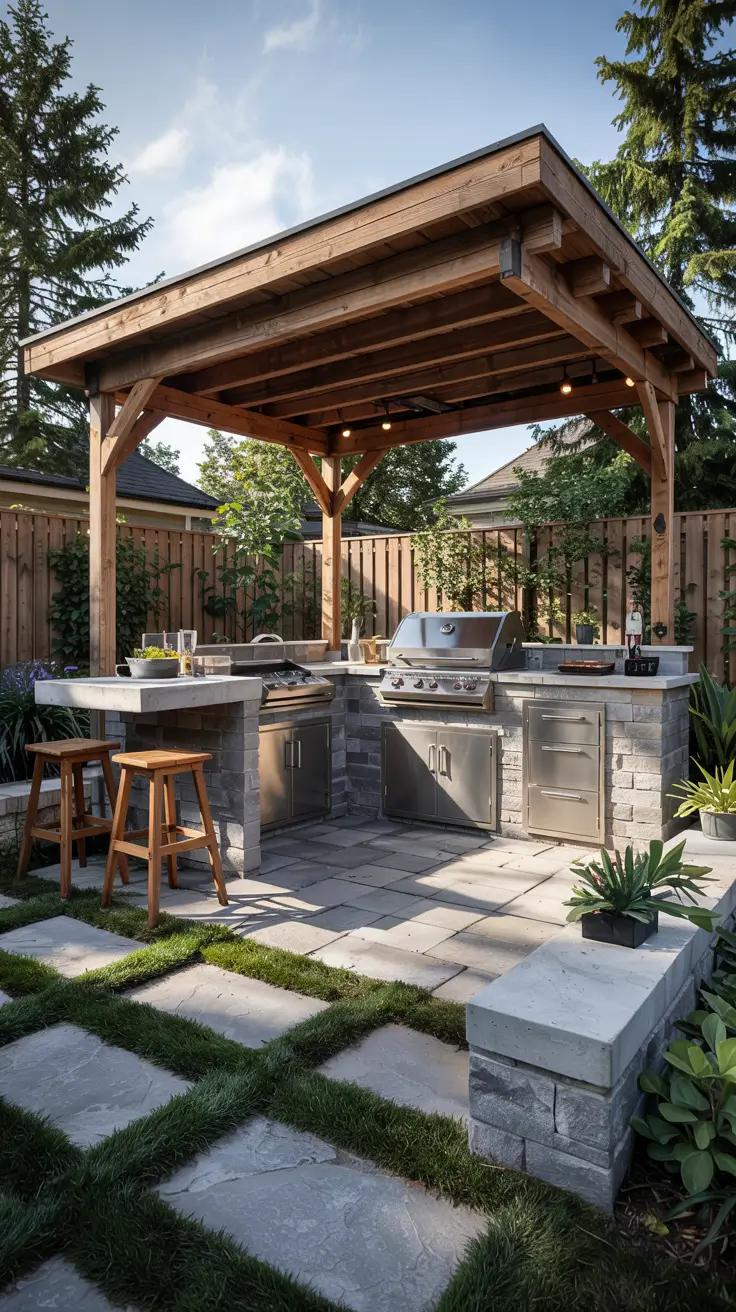
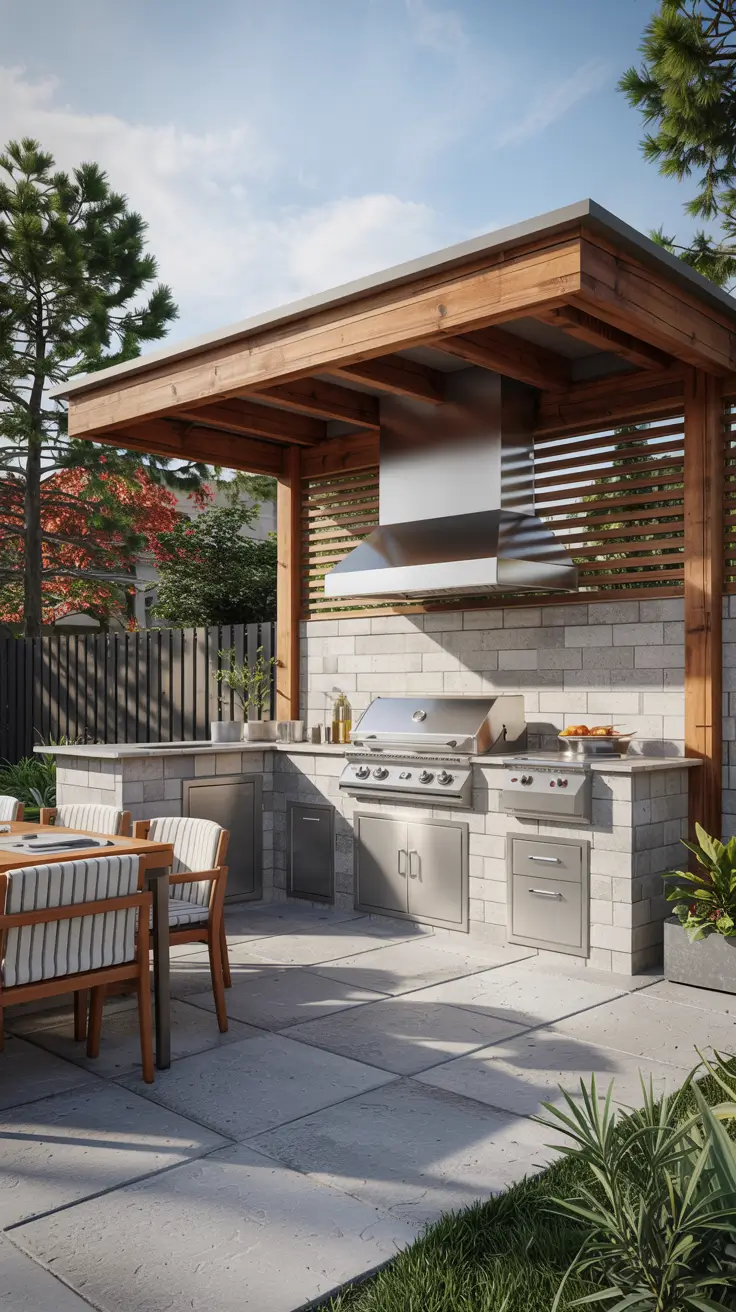
When I plan a covered grilling space, I start by treating the roof like an exterior building system, not a decorative afterthought. In 2026, the most dependable outdoor bbq area with roof designs balance structure, airflow, and heat resistance, especially above a grill. My first go-to idea is a timber pergola with a fire-safe ceiling zone over the cook line, because it feels warm while still letting heat escape. My second reliable idea is a powder-coated metal canopy with clean posts and concealed fasteners, because it reads modern and stays stable in wind. Both approaches work best when I keep the cook zone slightly open at the sides so smoke does not get trapped under the outdoor bbq area roof.
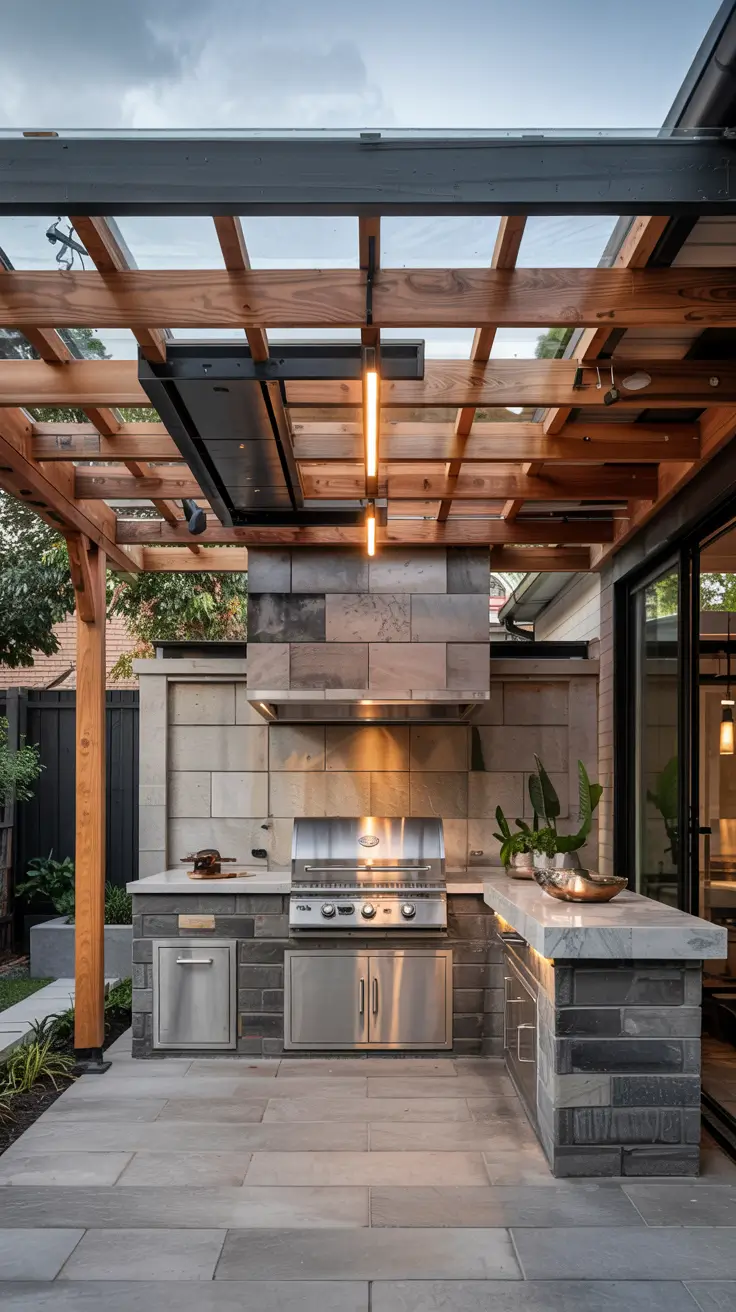
For the wood option, I like kiln-dried cedar or treated lumber for the main frame, then I add a non-combustible panel or metal trim where radiant heat is highest. I often specify stainless hardware, because it avoids streaking and holds up in rainy seasons without constant maintenance. For the metal option, I prefer aluminum or galvanized steel with a high-quality powder coat, and I pair it with a heat-tolerant soffit or slatted ceiling detail. If the client wants more light, I use polycarbonate roof panels as a third material strategy, but only when the panel type is rated for UV stability and installed with proper expansion gaps. Composite beams and trim can also be a smart durability layer, especially on posts and fascia where splashes and sun hit hardest.
From my experience, the best-looking roofs are the ones that age quietly, meaning they do not demand repainting or sealing every season. I also aim for materials that do not amplify heat, because a roof that turns into a radiant plate makes cooking uncomfortable in summer. Many outdoor design pros repeat the same principle I follow: choose finishes that are proven outdoors, then detail the edges so water sheds cleanly and does not sit in joints. I have seen polycarbonate work beautifully when it is used as a bright skylight strip instead of the entire roof, because it reduces glare while keeping the space airy. If you want a modern result without fuss, the safest bet is a simple structure with fewer seams, fewer exposed screws, and materials that were designed to live outside.
To complete this section, I would add a quick decision guide based on climate and sun exposure, because those factors can make the same material perform very differently. I would also include notes on heat clearance above the grill and where to place ventilation gaps, since that is what keeps the roof comfortable and safe. If you are choosing polycarbonate, I would add a reminder to match panel thickness to span length so it does not drum in wind. If you are choosing wood, I would add a recommendation to pre-finish pieces before installation for better coverage on all sides. Finally, I would add a short checklist for hardware and coatings so the whole system weathers as one, not as mixed parts.
BBQ Area Ideas Outdoor Rooftop: Safety, Wind Screens, And Space Planning
A rooftop layout changes everything, so when I design bbq area ideas outdoor rooftop, I start with the realities of wind, neighbors, and limited square footage. One strong 2026 idea is a compact corner kitchen with an L-shaped counter that hugs the parapet, because it reduces wind exposure and keeps circulation clear. Another strong idea is a straight-line galley setup along one wall with the grill centered, because it simplifies utilities and leaves the middle open for seating. On rooftops, I always think about how smoke travels, so I avoid placing the grill directly under a low ceiling plane or tight alcove. A well-planned outdoor bbq area with roof on a roof deck should feel calm and controlled, not like you are chasing napkins across the floor.
For wind screens, I like tempered glass panels or metal slat screens that break gusts without blocking all airflow. I pair those with a stable dining set that has weight to it, like a powder-coated aluminum table with a stone top or heavier chairs that do not tip easily. If space is tight, I add a built-in bench with storage under the seat, because it creates seating without cluttering the walking path. I also plan a safe landing zone next to the grill, like a 45 to 60 cm counter segment, so hot trays never need to cross the seating area. In a small outdoor bbq area with roof on a rooftop, these small moves make the space feel bigger and safer.
My personal rule is to design the rooftop like a miniature outdoor room with clear zones: cook, prep, serve, sit. I have learned that rooftops feel most luxurious when the safety pieces look intentional, like screens that match the roof posts and railings instead of looking added later. Many architects and outdoor kitchen designers emphasize the same concept: control wind and circulation first, then layer in style, because the comfort problems are what ruin the experience. I also like to reduce visual clutter by hiding utilities and choosing integrated lighting, since rooftops can look messy fast. When those fundamentals are right, the roofed zone becomes a natural gathering spot instead of a corner you only use on perfect weather days.
To finish this section, I would add a simple space-planning template that covers minimum aisle widths and where to place the grill relative to seating. I would also add rooftop-specific safety notes like choosing non-slip flooring and keeping clear access to any building exits or equipment areas. It would help to include guidance on sound and privacy, because rooftops amplify both conversations and cooking noise. I would also add a reminder to check weight limits before adding stone counters or heavy planters. Finally, I would include a small list of wind-screen options that still feel modern, so the safety elements blend into the design.
Outdoor Rooftop BBQ Area: Stylish Finishes For A Modern City Look
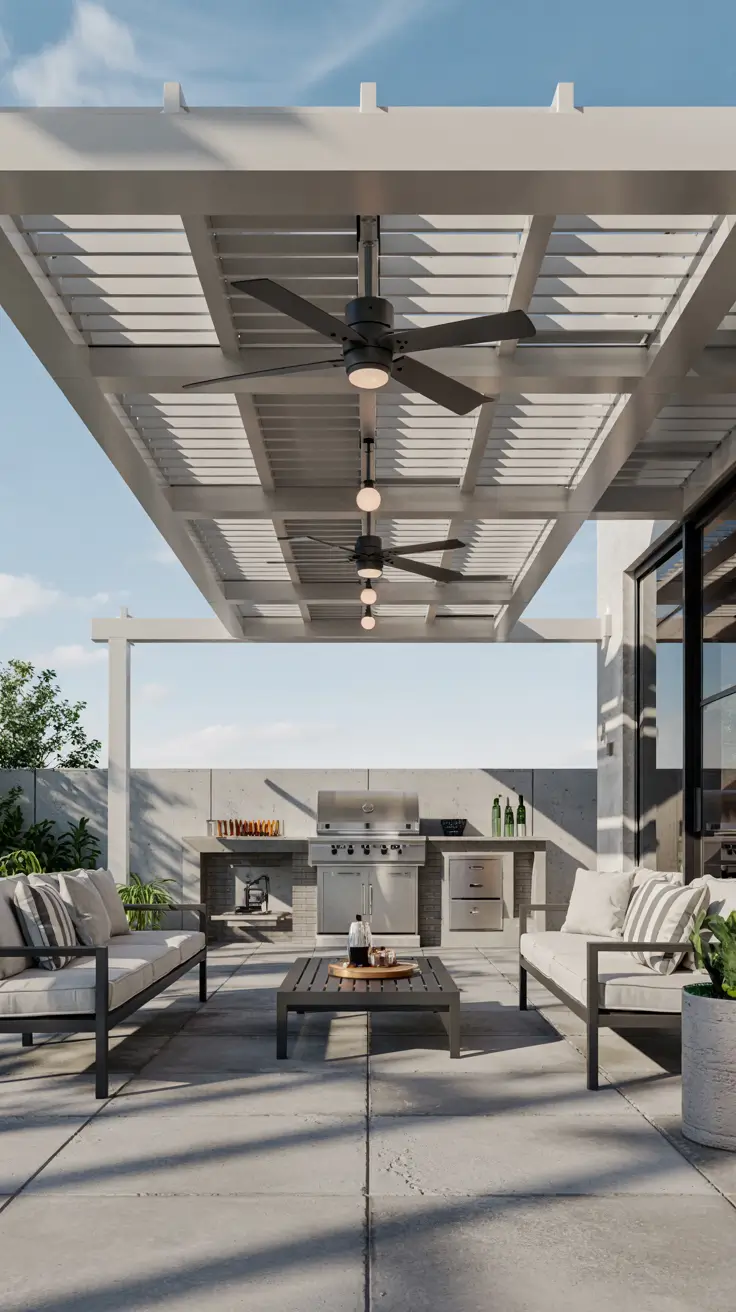
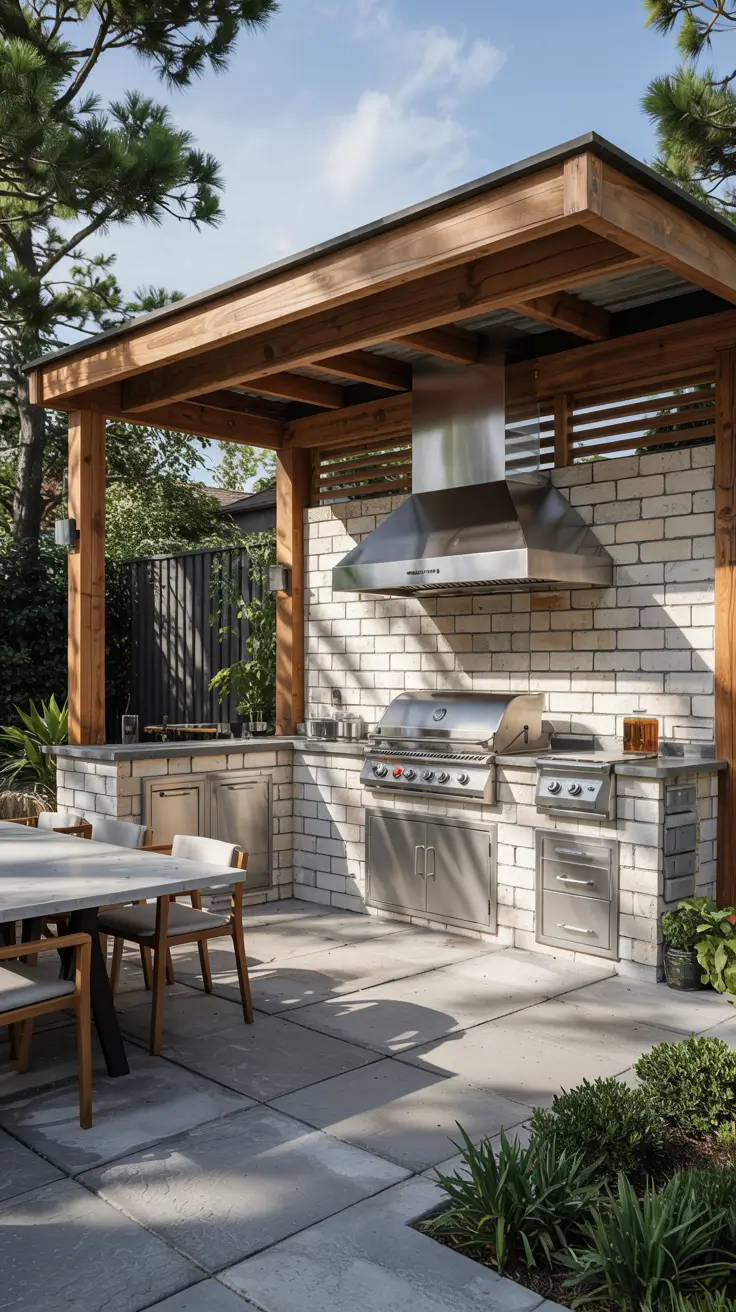
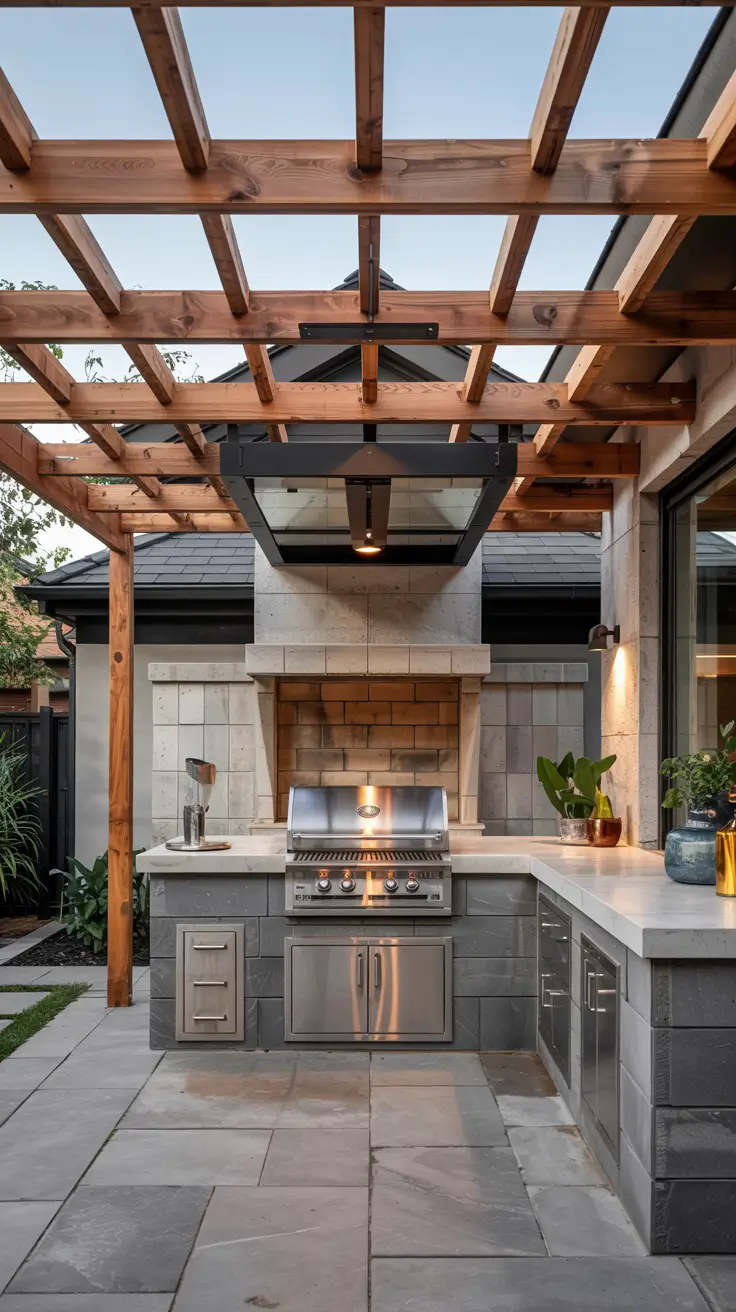
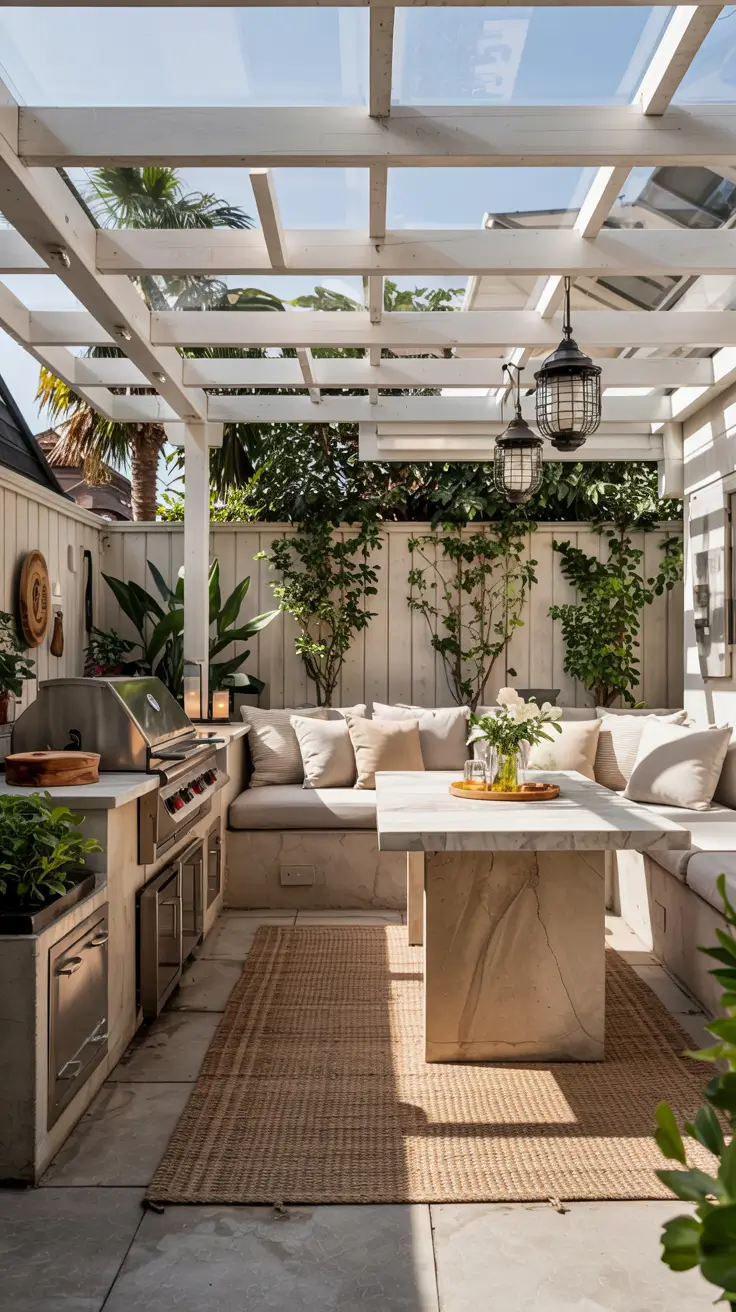
For a modern outdoor rooftop bbq area in 2026, I focus on finishes that feel architectural, not overly themed. My first style idea is a monochrome palette with charcoal porcelain pavers, matte black fixtures, and warm wood accents, because it looks sharp against skyline views. My second style idea is a light, coastal-modern look with pale stone, brushed metal, and soft neutral upholstery, because it keeps the space bright even under a roof. In both cases, I design the roof structure to match the finish story, so posts, beams, and screens look like one set. This is where the outdoor bbq area roof becomes part of the design language, not just shelter.
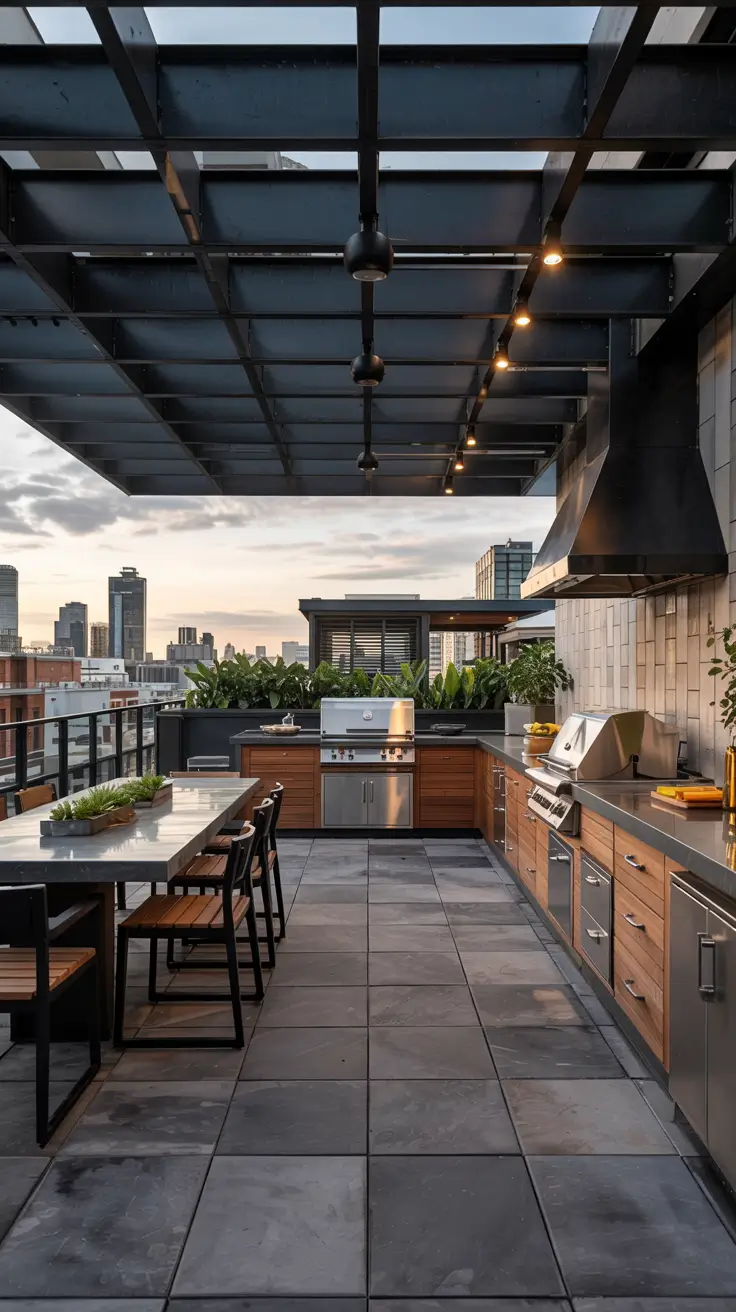
For surfaces, I like sintered stone or durable porcelain slabs on counters, because they handle heat, stains, and city grime with minimal maintenance. I often choose ribbed or fluted cabinet fronts in weather-rated materials, because the texture hides fingerprints and adds depth in evening lighting. For the ceiling, I like slim linear slats or a smooth panel with recessed lights, since it reads clean and frames the cook zone like an outdoor kitchen studio. If I add a backsplash, I keep it simple, like large-format tile or a metal panel, so it wipes down easily after grilling. To keep things cohesive, I repeat one finish across details, like matching the screen frame, cabinet pulls, and light trims.

In my experience, the fastest way to make a rooftop feel expensive is to reduce visual noise and choose fewer, better materials. I also try to avoid shiny finishes that reflect harsh sun, because rooftops already have a lot of glare. Many interior and exterior design editors talk about the value of restraint outdoors: a limited palette, consistent lines, and layered lighting. I agree with that approach, especially when you want a space that photographs well and still feels relaxing in person. When the finish plan is calm, your grill, food, and guests become the highlight rather than competing with busy patterns.
To round out this section, I would add more detail on lighting temperature and placement, because the right lighting is what makes modern finishes look refined at night. I would also add suggestions for hiding rooftop clutter like hose reels, covers, and spare fuel in matching storage. If you live in a high-rise corridor with strong wind, I would add notes on selecting heavier furniture bases and secure planters that match the finish palette. I would also include advice on choosing outdoor fabrics with texture so they look premium without being delicate. Finally, I would add a quick checklist to keep the whole finish plan consistent from floor to ceiling.
Outdoor BBQ Area Roof Add-Ons: Fans, Heaters, Curtains, And Privacy Panels
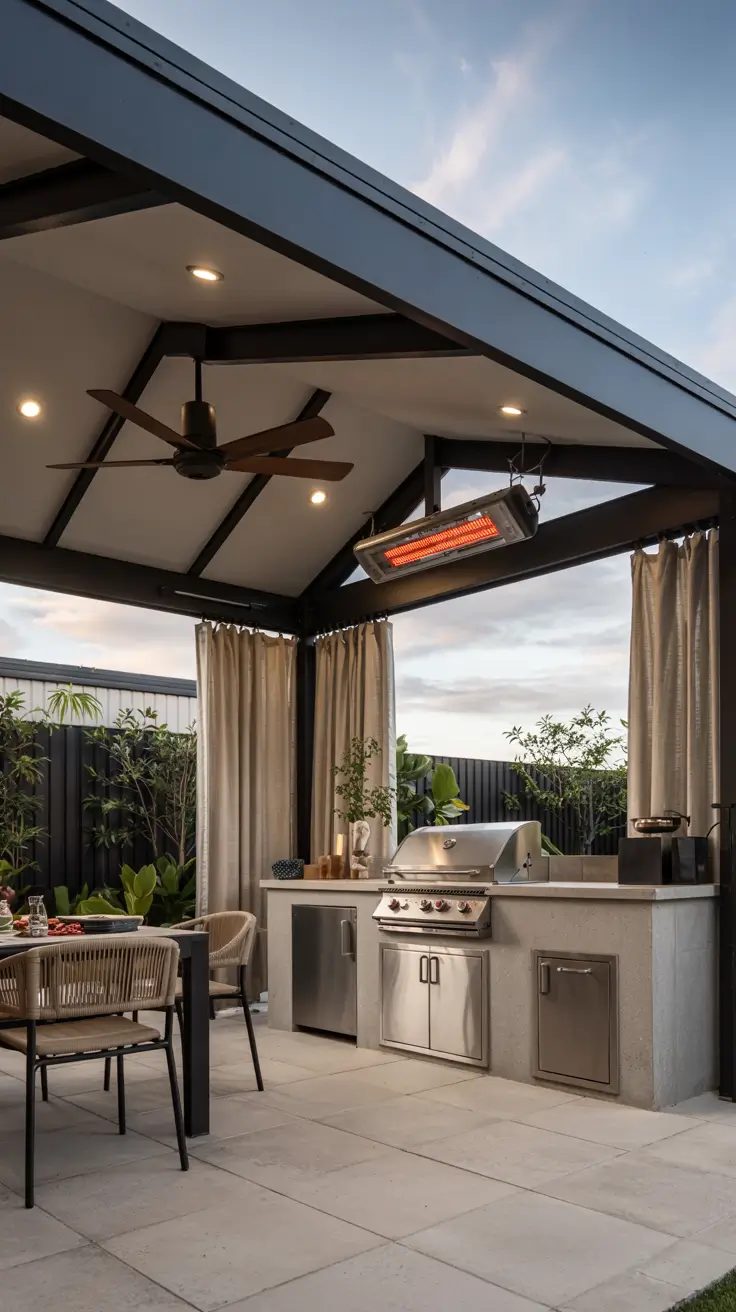
Once the roof structure is set, I treat comfort add-ons as the difference between a space you admire and a space you use every week. In 2026, the most practical outdoor bbq area with roof upgrades are the ones that extend the season and control glare without closing the space in. One idea I use often is a clean ceiling fan plus dimmable downlights, because it keeps air moving and makes cooking easier in summer evenings. A second idea is a heater and curtain combination that creates a warm pocket in shoulder seasons, especially when the seating area sits near open edges. These add-ons matter because a beautiful outdoor bbq area roof is only useful when the microclimate underneath is comfortable.

For fans, I choose outdoor-rated models with a quiet motor and a blade span sized to the covered zone, so airflow reaches both the grill and the seating. For heaters, I prefer discreet electric or infrared units mounted where heat washes the seating area, not directly into faces. Curtains can be modern when they are simple, like straight panels on a track in a neutral fabric, and they help with low sun and neighbor sightlines. Privacy panels work well when they match the roof posts, like slatted wood, metal screens, or frosted glass, and they can double as wind breaks. I also like to add a small control zone, like a weather-rated switch panel, so lights, fan, and heat feel integrated instead of scattered.
My design approach is to add only what you will actually use, because too many gadgets make the space feel like equipment storage. I also think about cleaning, since anything near a grill collects residue, so I avoid fussy textures directly above the cook line. Many outdoor living designers emphasize layering comfort the way you would indoors: air movement, warmth, privacy, and light in separate controls. I agree, because it lets you adapt to weather instead of giving up on the space. When these choices are planned early, the add-ons look built-in and modern rather than like afterthoughts.
To complete this section, I would add guidance on placement so fans do not push smoke back into the seating area. I would also add tips on selecting fabrics and hardware that resist mildew and corrosion, since curtains and tracks take a beating outdoors. If you are in a windy region, I would add advice on weighted curtain hems or tie-backs so panels do not whip around. I would also include a note about glare control, like combining curtains with a subtle shade screen on the sun side. Finally, I would add a checklist for electrical planning so outlets and switches are placed where you need them.
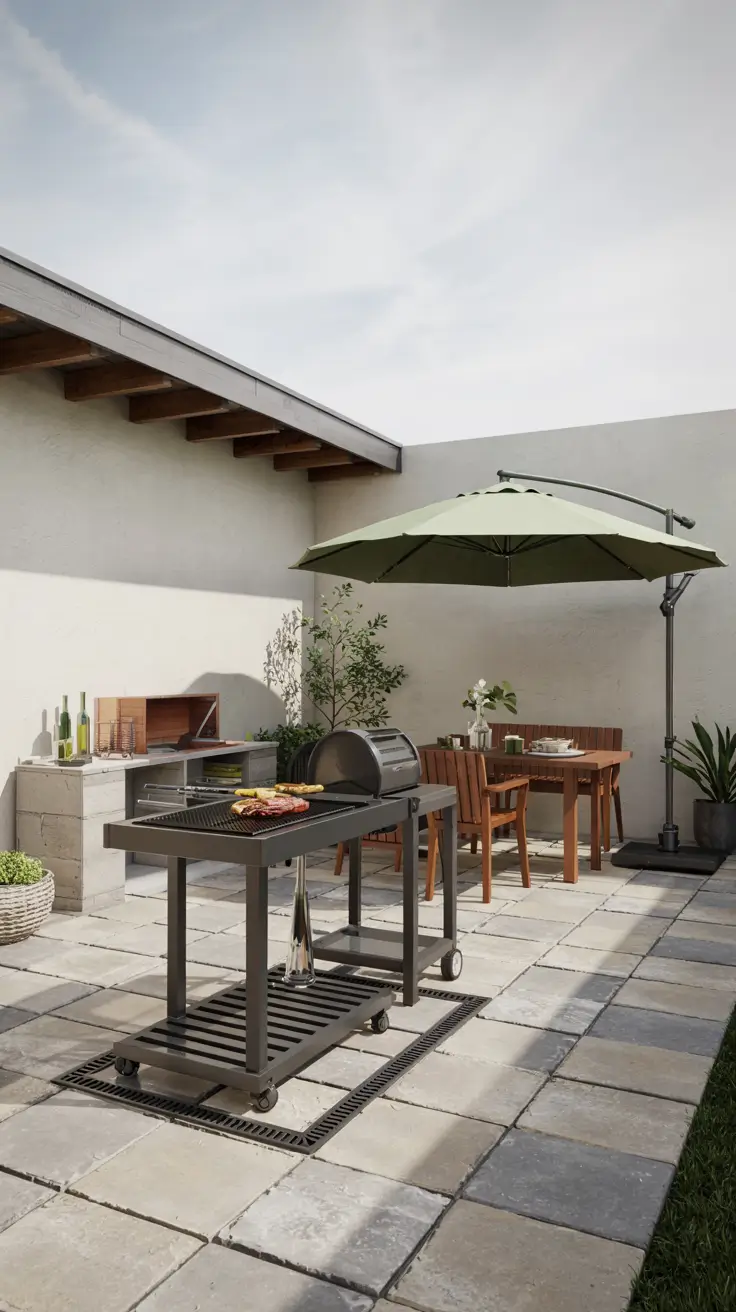
Outdoor BBQ Area Without Roof: When Open-Air Cooking Makes More Sense
Even though this article focuses on roofed spaces, I think it is important to be honest about when an outdoor bbq area without roof is the smarter choice. In 2026, open-air cooking still wins when you have strong smoke concerns, very limited height clearance, or a setting where views are the main feature. One idea I recommend is a portable, open-sky grill zone placed away from structures with a flexible prep cart, because it minimizes heat buildup and feels casual. Another idea is an open pergola frame with no solid top, which gives visual definition while keeping smoke and heat moving upward. Sometimes, the best outdoor rooftop bbq area is not the most enclosed one, especially in hot climates or tight urban conditions.
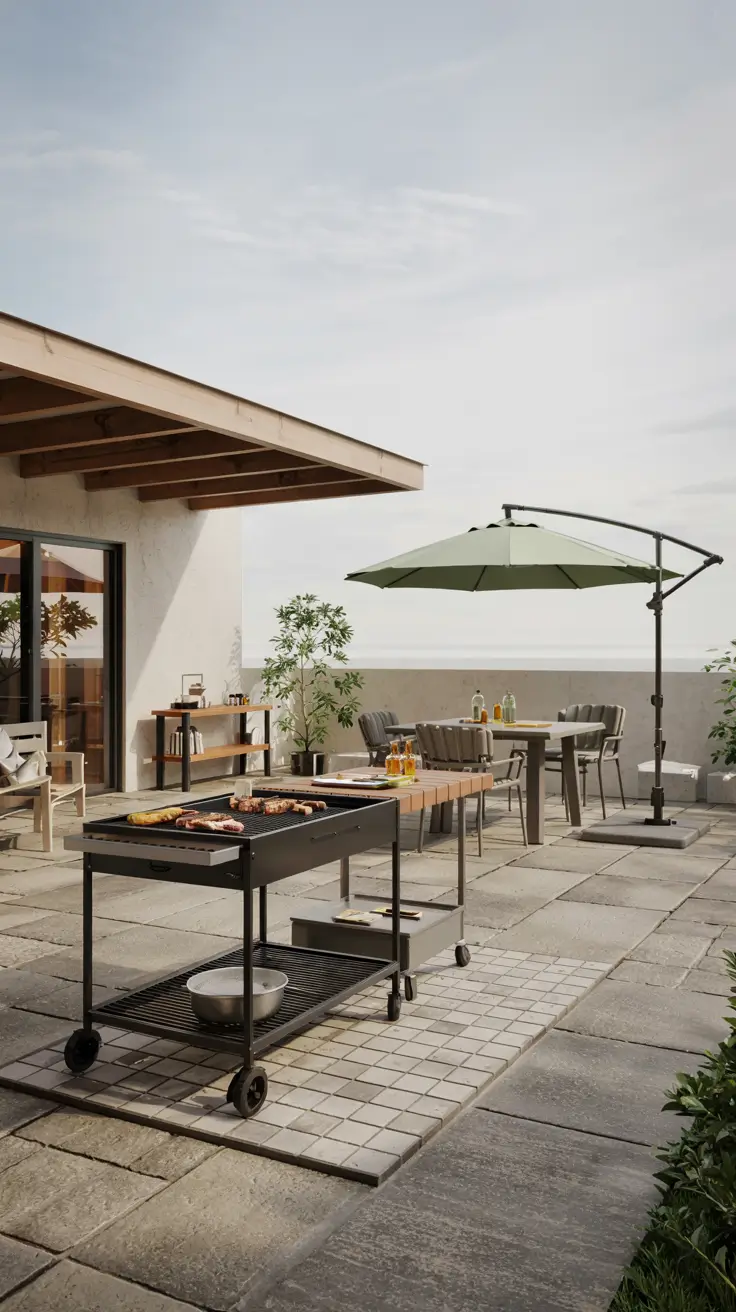
For an open setup, I still design the floor and layout like a room, using pavers, decking, or outdoor tile to define where cooking happens. I like a rolling prep cart with a heat-safe top, because it gives you workspace without committing to permanent counters. If shade is needed, I prefer a cantilever umbrella or sail shade positioned away from the grill, so the cooking zone stays clear and safe. I also build in storage using a bench or a slim cabinet against a wall, because open-air zones can look messy without a place to put tools. With these pieces, an outdoor bbq area without roof can feel intentional, not temporary.
In my experience, people sometimes overbuild a roof when what they really need is a better layout and a bit of shade in the right spot. I also find that open-air setups are easier to maintain, because there is less ceiling to clean and fewer seams to inspect after storms. Many safety-minded voices in outdoor cooking circles stress good ventilation and keeping hot equipment away from overhead combustibles, and open-air naturally supports that. I still like the comfort of a roofed zone, but I choose open-air when it fits the lifestyle and the site conditions better. The goal is not to force a roof, but to make cooking outdoors feel easy and safe.
To finish this section, I would add practical ways to create shade without putting anything directly above the grill. I would also add tips for weather protection like choosing furniture that dries fast and using breathable covers for equipment. If you are on a rooftop, I would add notes on wind management, because umbrellas and sails can become unsafe if not anchored properly. I would also include ideas for portable lighting so the open-air zone is usable after sunset. Finally, I would add a short comparison so you can decide when a roof helps more than it complicates.
Storage And Prep Zones: Counters, Sinks, Mini Fridges, And Hidden Bins
A roofed grilling area feels complete when prep and storage are planned as carefully as the grill itself. In 2026, my favorite approach is to create a compact working triangle: grill, landing counter, and a clean prep surface under the outdoor bbq area with roof. One idea I use often is a two-level counter, where the lower level is for prep and the higher level is for serving, because it keeps the cook zone tidy. Another idea is a slim, linear prep wall with integrated appliances, which is perfect for a small outdoor bbq area with roof where every centimeter matters. When storage is right, the space stays calm and you spend more time cooking than searching for tools.
For counters, I choose materials that handle heat and stains, like porcelain slab, stainless, or sintered stone, and I keep edges simple for easier cleaning. A sink is worth it when you grill often, even a compact bar sink, because it cuts trips inside and keeps food prep hygienic. I like mini fridges that are outdoor-rated or at least protected in a well-ventilated cabinet bay, so drinks and ingredients are always at hand. Hidden bins are a quiet luxury, because trash and recycling are part of cooking, and a concealed pull-out keeps the area looking polished. I also add hooks, drawers, and a dedicated spice zone, because good storage reduces countertop clutter immediately.
My personal test is whether I can cook a full meal without walking back and forth, because that is what makes an outdoor kitchen feel professional. I also pay attention to where drips and mess happen, and I place wipeable surfaces right where the action is. Many kitchen design principles translate outdoors: keep prep space near the grill, keep frequently used tools within reach, and avoid dead corners you cannot access. I have found that even a simple prep zone makes the roofed area feel like a real room, not just a grill under cover. When the functional layout is strong, the design choices like finishes and decor become much easier.
To complete this section, I would add exact examples of how much counter space to reserve for landing and prep, because that detail helps people plan realistically. I would also add notes on water supply and drainage options, since sinks can be done in different ways depending on the site. If you are on a rooftop, I would add suggestions for compact appliances and lighter counter materials to manage weight. I would also include guidance on ventilation inside cabinets, especially near fridges and bins. Finally, I would add a maintenance checklist so storage stays clean and doors do not warp over time.
Finishing Touches For 2026: Seating, Greenery, And Decor That Completes The Space
The final layer is what turns a functional roofed grill zone into a place people want to linger. In 2026, I see the best outdoor bbq area roof designs using furniture and decor that feel like an extension of the home, just built for weather. One finishing idea I use is a built-in banquette with a dining table, because it creates a cozy, space-efficient nook under cover. Another idea is a lounge and dining hybrid, with a small dining set near the grill and a low seating area at the edge, because it supports both cooking and relaxing. These choices matter because the roof gives you structure, and the furnishings give you atmosphere.
For seating, I look for deep, supportive cushions in outdoor performance fabric, and I choose frames that will not wobble after a season of sun and rain. I like a dining table with a durable top, such as stone-look porcelain or sealed teak, because it handles hot plates and spills without stress. Greenery is essential, but I use planters strategically, like tall plants for privacy at the perimeter and herbs near the prep zone for convenience. For decor, I keep it minimal and tactile: textured cushions, a durable outdoor rug, and a few lantern-style lights that soften the space at night. When it is a rooftop, I choose heavier planters and stable accessories so wind does not turn styling into a constant fight.
My own preference is to make the space feel finished but not precious, because outdoor cooking is messy and should stay relaxed. I also like to add one focal element, like a statement light, a modern screen wall, or a fireplace bowl placed away from the grill, so the space has a clear identity. Many designers talk about bringing indoor rules outdoors: comfortable seating, layered lighting, and a mix of textures that still cleans easily. I agree, and I find that people use the space more when it feels like a real room rather than patio furniture lined up under a roof. When you combine a thoughtful layout with inviting seating, the covered bbq zone becomes a natural weekend habit.
To finish this section, I would add a seasonal styling plan so the space stays inviting year-round, not just in summer. I would also add guidance on choosing plants that match your sun and wind exposure, especially for rooftops where conditions are harsher. If you entertain often, I would add a dedicated serving station or bar cart zone so food and drinks do not crowd the prep counter. I would also include advice on acoustic softness, like rugs and cushions, because hard surfaces under a roof can echo. Finally, I would add a small checklist for comfort items like throw blankets, bug-friendly lighting, and storage for cushions when storms roll in.